As we all know that Arduino programming language can be divided in three main parts: structure, functions, and values (variables and constants).
In my last article I have discussed about the Structure the Arduino program.
Now let as learn about the functions in Arduino program.
Functions:
For programmers accustomed to using BASIC, functions in
Arduino provide (and extend) the utility of using subroutines (GOSUB in BASIC).
Standardizing code fragments into functions has several
advantages:
Functions help the programmer stay organized. Often this helps to conceptualize the program.
Functions codify one action in one place so that the function only has to be thought out and debugged once.
This also reduces chances for errors in modification, if the code needs to be changed.
Functions make the whole sketch smaller and more compact because sections of code are reused many times.
They make it easier to reuse code in other programs by making it more modular, and as a nice side effect, using functions also often makes the code more readable.
There are two required functions in an Arduino sketch,
setup() and loop(). Other functions must be created outside the brackets of
those two functions. As an example, we will create a simple function to
multiply two numbers.
To "call" our simple multiply function, we pass it
parameters of the datatype that it is expecting:
void loop(){
int i = 2;
int j = 3;
int k;
k = myMultiplyFunction(i, j); // k now contains 6
}
Our function needs to be declared outside any other
function, so "myMultiplyFunction()" can go either above or below the
"loop()" function.
The entire sketch would then look like this:
void setup () {
Serial.begin(9600);
}
void loop() {
int i = 2;
int j = 3;
int k;
k =
myMultiplyFunction(i, j); // k now contains 6
Serial.println(k);
delay(500);
}
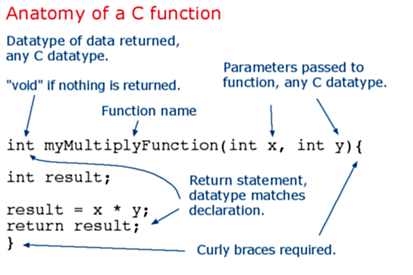
int myMultiplyFunction(int x, int y){
int result;
result = x * y;
return result;
}
Let’s see some basic functions related to Startup and GPIO that are frequently used in Arduino IDE.
Functions at startup
- setup ()
- loop ()
We have studied setup () and loop () in previous article.
Now let us see about the Functions using GPIO


0 Comments